
We did it! We finally painted our hideous pink cabinets. After much deliberation, we decided to paint them instead of stain them. This was mostly because we realized that the cabinets had been white washed/painted with a coral white color. As we painted the walls, replaced the appliances, and finally replaced the flooring, the white washed cabinets became more and more pink. So, we decided to paint them!
First, we moved everything out as best as we could and removed the doors. The doors went into the garage where they were cleaned with TSP substitute and then sanded. The frames got the same treatment inside. Next, we primed the doors and frames with a high build, sandable prime. This was a bit overkill for our cabinets but it was recommended by This Old House. Next, we sanded down the prime to get rid of brush strokes (or at least try, that stuff was difficult to sand off!!! We had to change the grit from 220 to 100 because nothing was happening). This step took us like 4 hours. After cleaning off the dust with tack cloth it was time to paint!
We purchased a Wagner Paint Ready System at Lowes. It was $150 but was worth every penny. It made painting the cabinets a breeze and gave a very professional finish. The frames had to be painted by hand but that was just fine. I painted the frames inside while Andrew used the paint sprayer on the cabinets outside. We then gave them a second coat the next day. After drying for another 48 hours, we installed IKEA Metrik stainless steel handles. They have two sizes. We used the large handles on the main doors and the small handles on the drawers and little cabinets above the range and fridge. Next, we attached the doors to the frames.
I can't believe the transformation! I don't recognize my kitchen anymore and I think that is a good thing. ;)
We aren't finished with our kitchen remodel yet! Next we will be getting new counter tops to match the counters in our bathrooms and then Andrew will be installing a tile backsplash to finish the modern, clean look. One step at a time and painting the cabinets was one giant step!
 |
| This is a shot of the kitchen before we replaced the flooring. |
 |
| Here is a before shot of the kitchen with the tile floors. As you can see the cabinets look a bit pink. |
 |
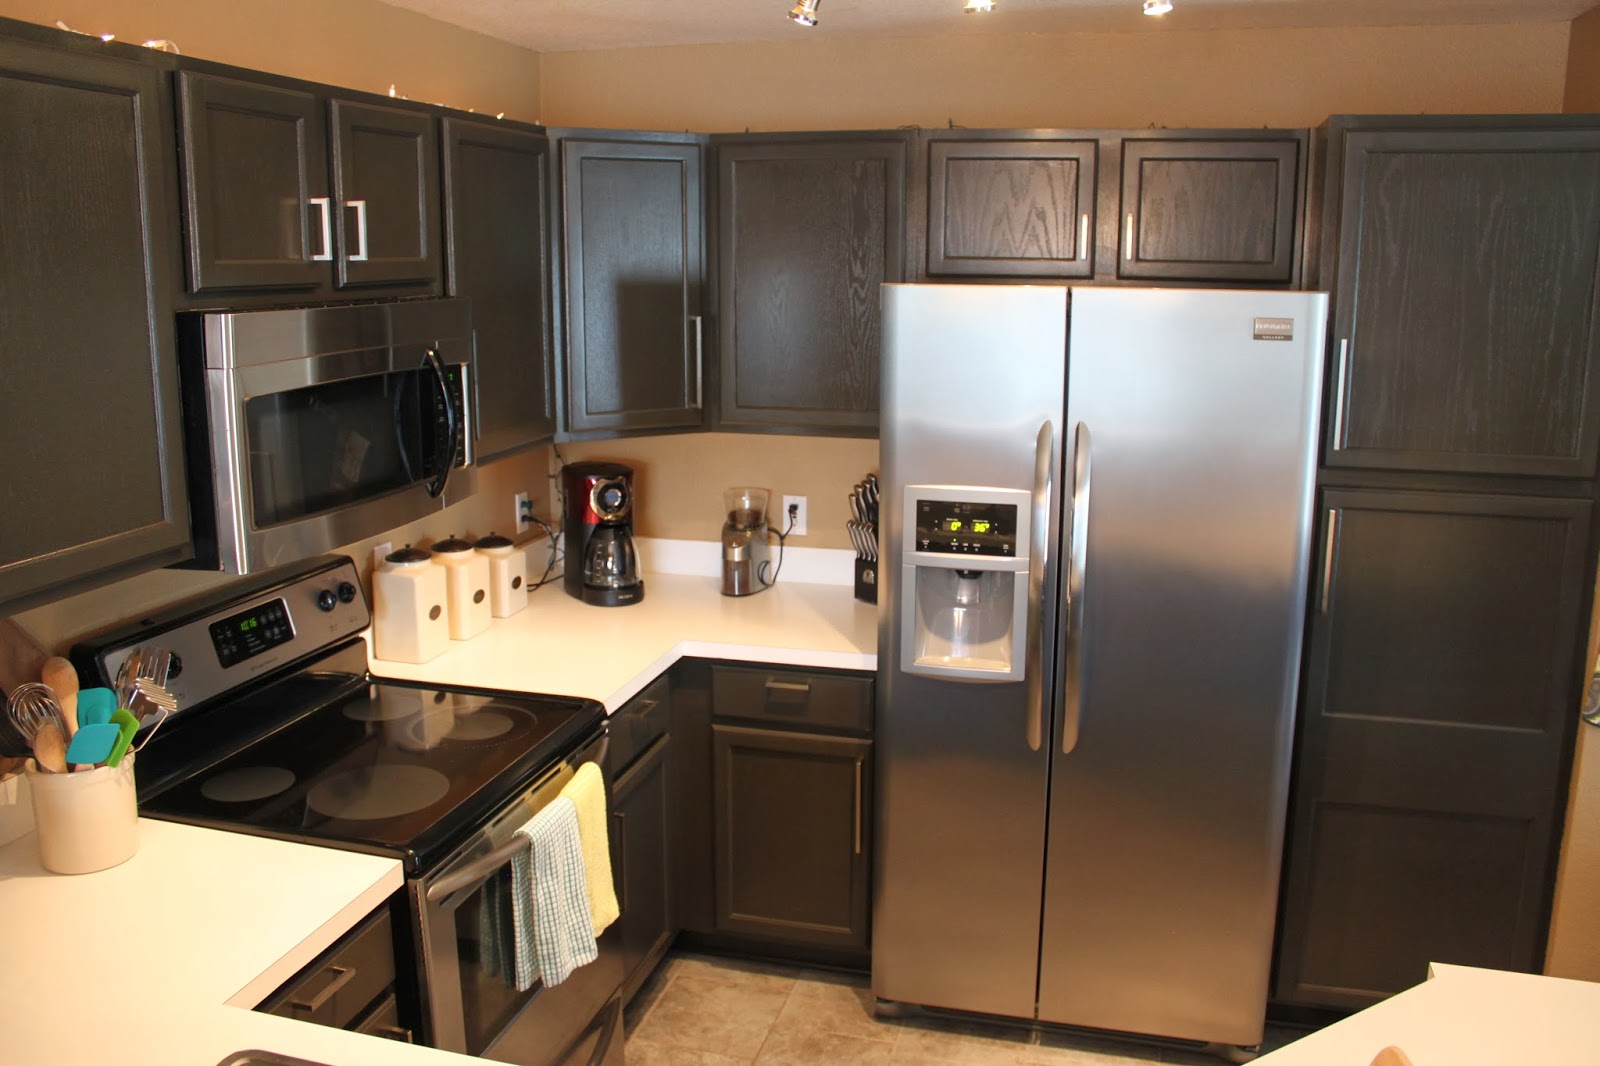
| And here is our beautiful transformation. The color we used is Behr Stealth Jet. |


What do you think of the change?
Wow, what a fabulous transformation! Great job, and the risk to go so dark really paid off. Your kitchen now looks sophisticated and grounded.
ReplyDeleteBlessings,
Toni
Thank you so much! We are very happy with the results. It was definitely worth all the work. :D
DeleteWhat paint did you use?
ReplyDeleteWe used Behr Semi Gloss in Stealth Jet. After reading the This Old House article and talking to the employees at Home Depot, we opted to use traditional 100% acrylic (the same as you would buy for your walls) instead of an oil based paint. With the sanding and primer, it sticks really well. Go with the two steps of painting on a primer and then the paint instead of a paint/primer mix.
DeleteAmazing! We have the same bleached oak as you originally had and I have been stressing over what color to paint them. We wanted to get knew ones but the granite that is on the cabinets is fairly new (and although not my color choice, it's fine for now. If we remove the cabinets, we risk breaking the granite. So refinishing them myself it is!) Love this color. Just wondering, is it black or a dark brown (like an espresso)?
ReplyDeleteIt is kind of a blend of charcoal gray (nearly black) and espresso. We had two colors picked out and tested them on the drawer faces before we committed to either one. One was called coffee bean and the other was this one. We liked that it was nearly black but still had a faint brown color. We didn't want the color to be all brown or all black because we were afraid it would turn out flat. Good luck with your cabinets! I am sure they will turn out beautifully. It is a very rewarding DIY.
DeleteGreat job. Thank you so much for the pictures and posting. Great inspiration for my kitchen to be.... :)
ReplyDeleteHow are they holding up to the wear and tear of everyday use? Looking to do this to our cabinets as well. Are they easy to wipe clean?
ReplyDeleteThey are holding up very well. So far no dings or scratches on the faces of the cabinets. There was one side part of the cabinets that wasn't real wood (laminate, :P) and that needs a few touch ups. However, super nice still. I clean them with watered down murphy's oil and they clean right up. The glossy paint finish makes it super easy to wipe clean.
DeleteI used a very similar color to paint mismatched furniture in my son's room. Since it was a custom color I had to buy a big can so now I'm thinking of using it to paint the kitchen cabinets in a house we rent out. Thanks for sharing your pics; you did a great job!
ReplyDeleteThat's awesome! Good luck on your project! It is so rewarding! :D
Delete